How to programme an SPI flash chip with the BeagleBone Black
This document exists as a guide for reading from or writing to an SPI flash chip with the BeagleBone Black,
using the flashrom software.
BeagleBone Black rev. C was used when creating this guide, but earlier revisions
may also work.
Back to previous index
Hardware requirements
Shopping list (pictures of this hardware is shown later):
-
External SPI programmer: BeagleBone Black (rev. C)
is highly recommended. Sometimes referred to as 'BBB'.
This page contains a list of distributors.
-
Electrical tape: cover the entire bottom surface of the BBB (the part that
rests on a surface). This is important, when placing the BBB on top of a board
so that nothing shorts.
-
Clip for connecting to the flash chip: if you have a SOIC-16
flash chip (16 pins), you will need the Pomona 5252
or equivalent. For SOIC-8 flash chips (8 pins), you will
need the Pomona 5250 or equivalent. Do check which chip you have,
before ordering a clip. Also, make sure to buy at least two clips
(they break easily).
-
External 3.3V DC power supply, for powering the flash chip.
An ATX power supply / PSU (common on Intel/AMD desktop computers) will work for this.
-
External 5V DC power supply, for powering the BBB.
The BeagleBone can have power supplied via USB, but a
dedicated power supply is recommended.
-
Pin header / jumper cables (2.54mm / 0.1" headers)
You should get male-male, male-female and female-female
cables in 10cm and 20cm sizes. Just get a load of them.
other possible names for these cables:
- flying leads
- dupont (this is just one possible brand name)
- Often used on breadboards, so they might be called breadboard cables
- Maybe they are called wires instead of cables or leads
-
Mini USB A-B cable (the BeagleBone probably already comes
with one.)
-
FTDI TTL cable or debug board, for accessing the serial console on your BBB.
This page contains
a list.
Back to top of page.
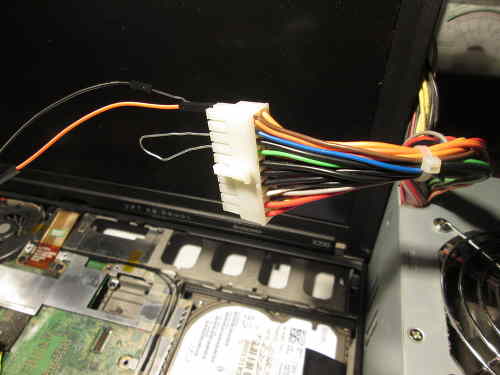
Setting up the 3.3V DC PSU
ATX PSU pinouts are on wikipedia
On 20-pin ATX PSUs, you can use pin 1 or 2 on a 20-pin ATX PSU (or pin 12 on a 24-pin ATX PSU) for 3.3V,
and any of the ground/earth sources (black cables).
Short PS_ON# / Power on (pin 16 on 24-pin ATX PSU, or pin 14 on a 20-pin ATX PSU) to a ground
(black. there is one right next to it) using a wire/paperclip/jumper then
power on the PSU.
On newer 24-pin ATX PSUs, there is an additional 3.3V (orange) on pin 12.
You only need one 3.3V supply and one ground for the flash chip, after grounding PS_ON#.
The male end of a 0.1" or 2.54mm header cable is not thick enough to remain permanently
connected to the ATX PSU on its own.
When connecting header cables to the connector on the ATX PSU, use a female end attached to
a thicker piece of wire (you could use a paper clip), or wedge the male end of the jumper cable
into the sides of the hole in the connector, instead of going through the centre.
Here is an example set up:

Accessing the operating system on the BBB
The operating system on your BBB will probably have an SSH daemon
running where the root account has no password. Use SSH to access
the operating system and set a root password. By default, the OS
on your BBB will most likely use DHCP, so it should already have an IP
address.
You will also be using the OS on your BBB for programming an SPI flash chip.
Alternatives to SSH (in case SSH fails)
You can also use a serial FTDI debug board with GNU Screen, to access the serial console.
# screen /dev/ttyUSB0 115200
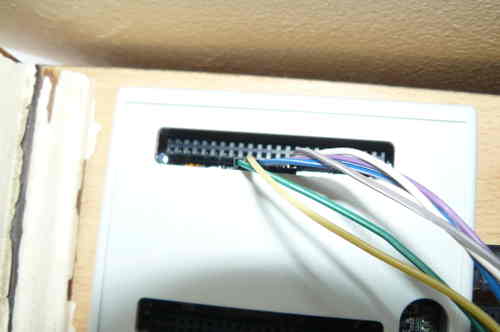
Here are some example photos:


You can also connect the USB cable from the BBB to another computer and a new network interface will appear,
with its own IP address. This is directly accessible from SSH, or screen:
# screen /dev/ttyACM0 115200
You can also access the uboot console, using the serial method
instead of SSH.
Setting up spidev on the BBB
Log on as root on the BBB, using either SSH or a serial console as defined in
#bbb_access. Make sure that you have internet access
on your BBB.
Follow the instructions at http://elinux.org/BeagleBone_Black_Enable_SPIDEV#SPI0
up to (and excluding) the point where it tells you to modify uEnv.txt
You need to update the software on the BBB first. If you have an
element14 brand BBB (sold by Premier Farnell plc. stores like
Farnell element14, Newark element14, and Embest), you may need
to work around a bug
in the LED aging init script before you can update your
software. If you don't have a file named
/etc/init.d/led_aging.sh, you can skip this step and update your
software as described below. Otherwise, replace the contents of
this file with:
#!/bin/sh -e
### BEGIN INIT INFO
# Provides:          led_aging.sh
# Required-Start:    $local_fs
# Required-Stop:     $local_fs
# Default-Start:     2 3 4 5
# Default-Stop:      0 1 6
# Short-Description: Start LED aging
# Description:       Starts LED aging (whatever that is)
### END INIT INFO

x=$(/bin/ps -ef | /bin/grep "[l]ed_acc")
if [ ! -n "$x" -a -x /usr/bin/led_acc ]; then
    /usr/bin/led_acc &
fi
Run
apt-get update and
apt-get upgrade then reboot the BBB, before continuing.
Check that the firmware exists:
# ls /lib/firmware/BB-SPI0-01-00A0.*
Output:
/lib/firmware/BB-SPI0-01-00A0.dtbo
Then:
# echo BB-SPI0-01 > /sys/devices/bone_capemgr.*/slots
# cat /sys/devices/bone_capemgr.*/slots
Output:
 0: 54:PF---
 1: 55:PF---
 2: 56:PF---
 3: 57:PF---
 4: ff:P-O-L Bone-LT-eMMC-2G,00A0,Texas Instrument,BB-BONE-EMMC-2G
 5: ff:P-O-L Bone-Black-HDMI,00A0,Texas Instrument,BB-BONELT-HDMI
 7: ff:P-O-L Override Board Name,00A0,Override Manuf,BB-SPI0-01
Verify that the spidev device now exists:
# ls -al /dev/spid*
Output:
crw-rw---T 1 root spi 153, 0 Nov 19 21:07 /dev/spidev1.0
Now the BBB is ready to be used for flashing. Make this persist
across reboots:
In /etc/default/capemgr add CAPE=BB-SPI0-01 at the end
(or change the existing CAPE= entry to say that, if an
entry already exists.
Get flashrom from the libreboot_util release archive, or build it from libreboot_src/git if you need to.
An ARM binary (statically compiled) for flashrom exists in libreboot_util releases. Put the flashrom binary
on your BBB.
You may also need ich9gen, if you will be flashing an ICH9-M laptop (such as the X200). Get it from libreboot_util,
or build it from libreboot_src, and put the ARM binary for it on your BBB.
Finally, get the ROM image that you would like to flash and put that on your BBB.
Now test flashrom:
# ./flashrom -p linux_spi:dev=/dev/spidev1.0,spispeed=512
Output:
Calibrating delay loop... OK.
No EEPROM/flash device found.
Note: flashrom can never write if the flash chip isn't found automatically.
This means that it's working (the clip isn't connected to any flash chip,
so the error is fine).
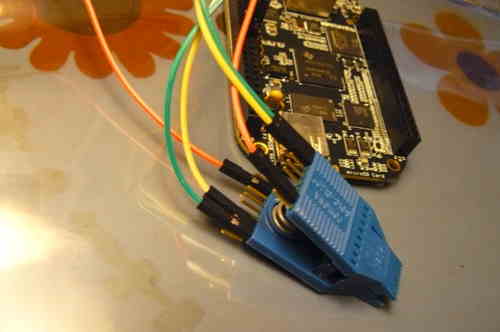
Connecting the Pomona 5250/5252
Use this image for reference when connecting the pomona to the BBB:
http://beagleboard.org/Support/bone101#headers
(D0 = MISO or connects to MISO).
The following shows how to connect clip to the BBB (on the P9 header), for SOIC-16 (clip: Pomona 5252):
 NC              -       - 21
 1               -       - 17
 NC              -       - NC
 NC              -       - NC
 NC              -       - NC
 NC              -       - NC
 18              -       - 3.3V (PSU)
 22              -       - NC - this is pin 1 on the flash chip
This is how you will connect. Numbers refer to pin numbers on the BBB, on the plugs near the DC jack.

You may also need to connect pins 1 and 9 (tie to 3.3V supply). These are HOLD# and WP#.
On some systems they are held high, if the flash chip is attached to the board.
If you're flashing a chip that isn't connected to a board, you'll almost certainly
have to connect them.

SOIC16 pinout (more info available online, or in the datasheet for your flash chip):
HOLD	1-16	SCK
VDD	2-15	MOSI
N/C	3-14	N/C
N/C	4-13	N/C
N/C	5-12	N/C
N/C	6-11	N/C
SS	7-10	GND
MISO	8-9	WP
The following shows how to connect clip to the BBB (on the P9 header), for SOIC-8 (clip: Pomona 5250):
 18              -       - 1
 22              -       - NC
 NC              -       - 21
 3.3V (PSU)      -       - 17 - this is pin 1 on the flash chip
This is how you will connect. Numbers refer to pin numbers on the BBB, on the plugs near the DC jack.

You may also need to connect pins 3 and 7 (tie to 3.3V supply). These are HOLD# and WP#.
On some systems they are held high, if the flash chip is attached to the board.
If you're flashing a chip that isn't connected to a board, you'll almost certainly
have to connect them.

SOIC8 pinout (more info available online, or in the datasheet for your flash chip):
SS	1-8	VDD
MISO	2-7	HOLD
WP	3-6	SCK
GND	4-5	MOSI
NC = no connection
DO NOT connect 3.3V (PSU) yet. ONLY connect this once the pomona is connected to the flash chip.
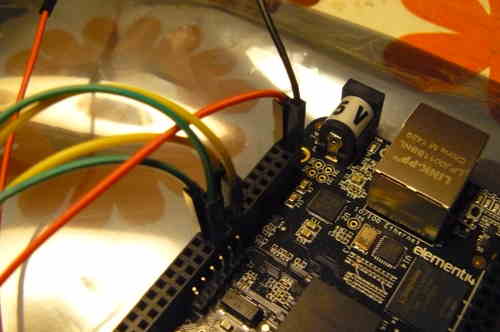
You also need to connect the BLACK wire (ground/earth) from the 3.3V PSU to pin 2 on the BBB (P9 header).
It is safe to install this now
(that is, before you connect the pomona to the flash chip); in fact, you should.
if you need to extend the 3.3v psu leads, just use the same colour M-F leads, but keep all other
leads short (10cm or less)
You should now have something that looks like this:


Back to top of page.
Notes about stability
http://flashrom.org/ISP
is what we typically do in libreboot, though not always. That page
has some notes about using resistors to affect stability. Currently,
we use spispeed=512 but it is possible to use higher speeds while
maintaining stability.
tty0_ in #libreboot was able to get better flashing speeds with the following configuration:
- "coax" with 0.1 mm core and aluminum foley (from my kitchen), add 100 Ohm resistors (serial)
- put heatstrink above the foley, for: CS, CLK, D0, D1
- Twisted pair used as core (in case more capacitors are needed)
-
See this image:
http://i.imgur.com/qHGxKpj.jpg
- He was able to flash at 50MHz (lower speeds are also fine).
EHCI debugging
- Find
USB port on the target that supports EHCI debug
- Initial
setup of BBB to act as EHCI debug dongle
- Patch
BBB's g_dbgp module (optional, but highly recommended)
- Configure
libreboot with EHCI debug
- Selecting
HCD Index and USB Debug port
- How to get the debug
logs
- Eneble
EHCI Debug on the target's kernel (optional, recommended)
- References
If your computer does not boot after installing libreboot, it is
very useful to get debug logs from it, from the payload (grub) and/or
the kernel (if gets to there). All of them stream debug logs on the
available serial (RS-232) by default. However, most of todays laptops
lack RS-232 port. The other option is to stream the logs to USB EHCI
debug port.
This section explains step-by-step how to setup BBB as a
“USB EHCI debug dongle” and configure libreboot and the
linux kernel to stream logs to it (TODO: grub).
I will refer to three computers:
- host - this is the computer you use, have
tools, compiler, Internet, etc
- BBB - Beaglebone Black (rev. B or higher, i
use rev. C)
- target - the computer you are trying to
install liberboot
Find USB port
on the target that supports EHCI debug
Not all USB controllers support EHCI debug (see: EHCI
Debug Port ). Even more, if a USB controller supports EHCI debug, it
is available only on a single port that might or might
not be exposed externally.
- You need running OS (GNU/Linux) on your target for this step
(If you’ve flashed libreboot and it does not boot, you have to
flush back the stock bios)
- You need USB memory stick (the data on it will not be
touched).
- The EHCI debugging can not be done through external hub, BBB
must be connected directly to the debug port of the controller (so, no
hubs)
- Download this
shell script.
- Plug the usb stick in the first available usb port
- Run the script, you will get output similar to following:
The following PCI devices support a USB debug port (says lspci): 0000:00:1a.0 0000:00:1d.0
The following PCI devices support a USB debug port (says the kernel): 0000:00:1a.0 0000:00:1d.0
*PCI device 0000:00:1a.0, USB bus 3, USB physical port 1*
*PCI device 0000:00:1d.0, USB bus 4, USB physical port 2*
Currently connected high-speed devices:
/:  Bus 04.Port 1: Dev 1, Class=root_hub, Driver=ehci-pci/2p, 480M
	|__ Port 1: Dev 2, If 0, Class=Hub, Driver=hub/8p, 480M
		|__ Port 7: Dev 14, If 0, Class=Hub, Driver=hub/4p, 480M
			|__ Port 1: Dev 15, If 0, Class=Hub, Driver=hub/4p, 480M
			|__ Port 3: Dev 17, If 0, Class=Hub, Driver=hub/2p, 480M
			|__ Port 4: Dev 18, If 0, Class=Hub, Driver=hub/4p, 480M
/:  Bus 03.Port 1: Dev 1, Class=root_hub, Driver=ehci-pci/2p, 480M
	|__ Port 1: Dev 2, If 0, Class=Hub, Driver=hub/6p, 480M
/:  *Bus 01*.Port 1: Dev 1, Class=root_hub, Driver=xhci_hcd/4p, 480M
	|__ *Port 3: Dev 31, If 0, Class=Mass Storage, Driver=usb-storage, 480M*
- The buses the support debug are Bus 3 (0000:00:1a.0) on Port 1
and Bus 4 (0000:00:1d.0) on port 2. Your usb stick is plugged on Bus
1, Port 3
- Repeat the steps, plugging the USB stick in the next available
port
- Go through all available ports and remember(write down) those
for which bus/port of the usb stick matches one of the bus/port that
support debug (bold).
Remember (write down) for each port (external plug) you found
that supports debug: PCI device id, the bus id, the port number, and
the physical location of the usb plug.
If you do not find a match, you can not get debug over EHCI.
Sorry.
Initial setup of
BBB to act as EHCI debug dongle
BBB must be powered with a barrel power connector since the
mini-B USB plug will be used for the EHCI debug stream. So you will
need:
- power supply (5V, 2A(10W) is sufficient).
- an extra usb cable: A to mini-B
(On BBB) The linux kernel includes module (g_dbgp that enables one of the usb ports on a computer to behave as EHCI
debug dongle. Make sure you have this module available on your BBB
(Debian 7.8 that comes with BBB should have it), if not, you should
compile it yourself (see next section):
ls /lib/modules/3.8.13-bone70/kernel/drivers/usb/gadget/g_dbgp.ko
Unload all other
g_*
modules:
# lsmod
# rmmod g_multi
...
Then load
g_dbgp
:
# modprobe g_dbgp
# lsmod # should show that g_dbgp is loaded, and no other g_*
Plug the mini-B side of the USB cable in your BBB and the A side in
your target. Then one of the usb devices on your target (with
lsusb
) should be:
Bus 001 Device 024: ID 0525:c0de Netchip Technology, Inc.
If you see the device on the target, you are good to continue to
the next step.
Patch BBB’s
g_dbgp
module (optional, but highly recommended)
For the reasons why you need this, see: EHCI Gadget Debug.
Make
sure that you have cross compiling environment for
arm-linux-gnueabihf
setup on your host.
- On BBB: uname -r - this will give you version
number like 3.8.13-bone70 (I will refer to this as: $mav.$miv-$lv:
where mav=3.8, miv=13, lv=bone70
- Get the BBB kernel ready on your host for cross-compiling:
$ cd $work_dir
$ git clone https://github.com/beagleboard/kernel.git
$ cd kernel
$ git checkout $mav (see above)
$ ./patch.sh
$ wget http://arago-project.org/git/projects/?p=am33x-cm3.git\;a=blob_plain\;f=bin/am335x-pm-firmware.bin\;hb=HEAD -O kernel/firmware/am335x-pm-firmware.bin
$ cp configs/beaglebone kernel/arch/arm/configs/beaglebone_defconfig
- Download the patch from here
- tar -xf Ehci-debug-gadget-patches.tar.gz (will
create dir: usbdebug-gadget)
- Note that there are two patches (patch_1 and patch_2) for each
of the two different version of the kernel (3.8 and 3.10). I will use
3.8. (If using kernel 3.12 patch_1 is not needed)
- cd kernel (note that this is one more level: you
should be in $work_dir/kernel/kernel)
- Apply the patches:
git apply ../usbdebug-gadget/v3.8-debug-gadget/0001-usb-dbgp-gadget-Fix-re-connecting-after-USB-disconne.patch
git apply ../usbdebug-gadget/v3.8-debug-gadget/0002-usb-serial-gadget-no-TTY-hangup-on-USB-disconnect-WI.patch
;
make ARCH=arm CROSS_COMPILE=arm-linux-gnueabihf- beaglebone_defconfig -j4@
-
You should also apply the linux-libre deblob script to turn it into linux-libre
(deletes all the blobs from the linux kernel).
fsfla website
- see scripts.
- Get your current BBB kernel config (from: /boot/config-<ver>)
and copy it to your host as $work_dir/kernel/kernel/.config
make ARCH=arm CROSS_COMPILE=arm-linux-gnueabihf- oldconfig - all default answers
Set proper version number:
- On your host, edit $work_dir/kernel/kernel/.config
(the one you’ve just copied from BBB), find the line CONFIG_LOCALVERSION="<something
or empty>" and change it to CONFIG_LOCALVERSION="-$lv",
so it will look something like: CONFIG_LOCALVERSION="-bone70"
Also, make sure that: CONFIG_USB_G_DBGP=m (If
not, make menuconfig, and set @Device Drivers-> USB
Support -> USB Gadget Support -> EHCI Debug Device Gadget=m
Build the module:
$ make ARCH=arm CROSS_COMPILE=arm-linux-gnueabihf- -j4 (is it possoble to build only the gadget modules)
$ mkdir ../tmp && make ARCH=arm CROSS_COMPILE=arm-linux-gnueabihf- INSTALL_MOD_PATH=../tmp modules_install
- on BBB, backup /lib/modules/3.8.13-bone70/kernel/drivers/usb/gadget
(i.e. mv
/lib/modules/3.8.13-bone70/kernel/drivers/usb/gadget $HOME)
- copy the freshly compiled usb/gadget dir to /lib/modules/3.8.13-bone70/kernel/drivers/usb
- restart BBB
- Remove all g_* modules (rmmod
g_<>)
- modprobpe g_dbgp
Libreboot(coreboot) should be configured with debug turned on and to
push debug messages to the EHCI debug port.
If you’ve
downloaded the binary distribution, you can check if it is properly
configured in the following way:
- Go to the libreboot dist root directory cd
$libreboot_bin
- Locate the rom image for your target (I will call it: $img_path)
- Running the following command will extract the config in a
file ./my_config:
./cbfstool/i686/cbfstool $img_path extract -n config -f ./my_config
- Make sure that the following params in the config are set as
following:
CONFIG_USBDEBUG=y (Generic Drivers -> USB 2.0 EHCI debug dongle support)
CONFIG_USBDEBUG_IN_ROMSTAGE=y (Generic Drivers -> Enable early (pre-RAM) usbdebug)
CONFIG_USBDEBUG_HCD_INDEX=<HCD Index of usb controller - see below> (Generic Drivers -> Index for EHCI controller to use with usbdebug)
CONFIG_USBDEBUG_DEFAULT_PORT=<USB Debug port - see below> (Generic Drivers -> Default USB port to use as Debug Port)
The following three are behind radio button in the menu. Only the first
one should be = y
USBDEBUG_DONGLE_STD=y                       (Generic Drivers -> Type of dongle (Net20DC or compatible) -> Net20DC or compatible)
CONFIG_USBDEBUG_DONGLE_BEAGLEBONE=n         (Generic Drivers -> Type of dongle (Net20DC or compatible) -> BeagleBone)
CONFIG_USBDEBUG_DONGLE_BEAGLEBONE_BLACK=n   (Generic Drivers -> Type of dongle (Net20DC or compatible) -> BeagleBone Black)
Then:
CONFIG_CONSOLE_USB=y (Console -> USB dongle console output)
Also
Debugging ---> Output verbose XYZ
) (FIXME somebody verify these):
CONFIG_DEBUG_CBFS=y (Output verbose CBFS debug messages )
CONFIG_HAVE_DEBUG_RAM_SETUP=y (??? What/where is this)
CONFIG_DEBUG_RAM_SETUP=y (Output verbose RAM init debug messages)
CONFIG_DEBUG_SMI=y      (Output verbose SMI debug messages)
CONFIG_DEBUG_ACPI=y     (Output verbose ACPI debug messages )
CONFIG_DEBUG_USBDEBUG=y (Output verbose USB 2.0 EHCI debug dongle messages)
If some of the above mentioned configuration options are not as
specified, you have to configure and compile libreboot yourself. Please
refer to the doc(FIXME: link about compiling libreboot.
Selecting
HCD Index
and
USB Debug port
This applies (and works) only if the USB controller that supports debug
(found in the first section) is from Intel.
If the PCI ID of the
port you found in the first section is
0000:00:1a.0
or
0000:00:1d.0
, you are ok. Otherwise you have to try without guarantee that will
work.
If the externally exposed port is on a bus with
PCI ID == 0000:00:1a.0
then for
CONFIG_USBDEBUG_HCD_INDEX
choose 2, otherwise choose 0
.
For
CONFIG_USBDEBUG_DEFAULT_PORT
choose the port from the first section that correspond to the
PCI ID
Notes:
The above is based on the implementation of
coreboot/src/southbridge/intel/common/usb_debug.c : pci_ehci_dbg_dev()
.
This is enough as it applies for the supported GM45/G45
Thinkpads. coreboot support some other contollers too, but they are
irellevent for libreboot (for now).
- On T500 (with switchable GPU) the debug ports for both intel
controllers is exposed.
- On x200t the debug ports for both intel controllers is
exposed.
How to get the debug logs
- Plug the USB cable in the target’s debug port (the one
you found in step 1) and BBB’s mini-B USB
- Make sure no other then g_dbgp of the g_*
modules is loaded on your BBB
- On the BBB:
stty -icrnl -inlcr -F /dev/ttyGS0
cat /dev/ttyGS0
- Power on the target with libreboot
- You should see debug logs comming on your BBB console
Note that this is not permanent on BBB, if you reboot it, you have to
rmmod g_*
and
modprobe g_dbgp
Eneble
EHCI Debug on the target’s kernel (optional, recommended)
You have to know how to compile kernel for your target.
- Check if early debugging is already enabled: grep
CONFIG_EARLY_PRINTK_DBGP /boot/config-<ver>
- If enabled, you do not have to compile the kernel (skip this
step). Otherwise, prepare kernel source for your distribution and
select (Kernel hacking -> Early printk via EHCI debug
port). Compile and install the new kernel.
- Edit your grub configuration and add following to the kenel
parameters: earlyprintk=dbgp,keep.
Also, try: earlyprintk=dbgp<N>,keep where N
is the debug port id if the first does not work.
References
TODO:
- grub does not send messages to EHCI debug. Investigate.
- The section “Configure libreboot with EHCI debug”
can be skipped/simplified if a common configuration works for all
relevant targets is selected as defualt
- Patch and compule g_dbgp on BBB instead cross-compile
- Find a simple way to send debug messages from targets userland
Copyright © 2014, 2015 Francis Rowe <info@gluglug.org.uk>
Copyright © 2015 Patrick "P. J." McDermott <pj@pehjota.net>
Copyright © 2015 Pi Van Den Cirkel <opdecirkel@gmail.com>
This document is released under the Creative Commons Attribution-ShareAlike 4.0 International Public License and all future versions.
A copy of the license can be found at ../license.txt.
This document is distributed in the hope that it will be useful,
but WITHOUT ANY WARRANTY; without even the implied warranty of
MERCHANTABILITY or FITNESS FOR A PARTICULAR PURPOSE. See ../license.txt for more information.


